As a web designer it’s likely you’ve been asked to create a new website as well as to make changes to an existing website. You may have made all the changes on the live website but whether you’re just updating a theme, plugins, adding new code or doing any form of editing, is using the live website really the best option?Changes can be seen by the site’s visitors and if they’re not right, can be confusing and inconvenient for them. Editing live may also break or disable some or all of the website’s functionalities if a mistake is made. So what’s the best way to update a website without effecting the live website? This is where using a staging area will help you.What is a staging area?A staging area or a staging site is simply a copy or clone of a website that is not connected with the live production site. A staging area is typically used by web designers to test themes, plugins and custom codes before they upload or publish it to the live website. This reduces the risk of making mistakes on a live website that are usually seen as broken codes, non-functional plugins or page crashes. A staging area allows you see what needs to be fixed or modified before you move everything to production.Why use a staging area?There’s certainly no law that prevents you from editing and making changes on a live website, however, that’s certainly not a best practice. Making changes to a live website carries a lot of risk, especially for stable and professionally run websites. If you’re still not convinced why you should use a staging area, here are some points you should consider:A staging area allows you to thoroughly test a site and make the necessary changes at your own pace. This is especially useful when you are housing a new website that has not yet launched. Can you imagine the unnecessary time pressure and stress you will put on yourself when you know that your live site is down or is in maintenance mode? You’re more likely to make errors or miss something if you’re in a hurry just so you can make the site live again.If you already have a website, using a staging area ensures the visitors and readers will not be interrupted while you are working on the site. It keeps all of the website’s functionalities intact so visitors do not know any work is being performed.A staging area reduces the risk of damage on a business. There are no bad impressions left because of a coding error or because any downtime. It also helps minimize possible damage to your conversions, sales and SEO. Search engines are suspicious of broken websites because they consider them risky for the overall user experience.This information is important to know but unless you know how to set-up a staging area, it’s not going to do you much good. So let’s go ahead and take a look at how to set-up a staging area and your options for doing so.**Please note: there are options here for both technical and non-technical users so depending on your experience you can jump around to the option that works best for you. If you’re new to this, I would recommend using one of the hosts that offers a staging area as this will be the easiest option for you.Where to set-up a staging area? When it comes to setting up a new website or working on an existing website, you have two options. Let’s review them here and then you can start creating the one that you prefer.Option #1: Using a local server or host (WAMP for Windows, MAMP for Mac)Setting up a local version (meaning on your own computer or server) is a good option for setting up a staging area. This option does, however, require a bit of technical knowledge.Here’s a good tutorial for how to set-up WordPress on WAMP here.Option #2: Using your hosts one-click staging areaDepending on your website hosting provider, a one-click staging area may already be a part of the package or features you have available. If not, you may be able to access this feature through another packge. This is a great option for web developers and website owners who want to save time setting up a staging site. Other advantages of using a managed hosting solution like this one are the security, the added speed and the extra features that make it easier to set up, manage and navigate. We’ll take a look at some good hosting providers who offer this option in just a bit.Option #3: Using a subdomain or subdirectory of your current websiteIf your hosting package or service does not include a staging area already, you can create one yourself. To do this you would create a subdomain or a subdirectory and set-up your test site there. To do this, follow these three steps:
1. Set up a subdomainIf your main domain is yourwebsite.com for example, you can create a subdomain such as test.yourwebsite.com. You could also create a subdirectory if you prefer such as yourwebsite.com/test. There is no benefit one way or the other so pick the one you prefer.2. Duplicate your live siteIf you are creating a new site you can simply install your CMS of choice (WordPress, Joomla, etc.) on the subdomain or subdirectory you have created.The simplest way to do this is by downloading your website’s content folder via FTP and then uploading it again on your subdomain’s own content folder. You will also need to export your site’s database and import it into the database for the staging site. This will copy all of your live site’s plugins, themes, media and content to your staging area. If this sounds too technical, don’t worry, you can still do this yourself using a plugin which we’ll get to in a bit.3. Secure your staging areaIf your staging area is publicly accessible, you’ll want to password protect the site so only registered users can access it. This will keep your staging area private while you experiment with your site’s updates. You’ll also want to disable XML sitemaps on your sub-domain and ask search engines not to crawl or index the site.How to Set-Up Your Staging AreaAs we have discussed earlier, creating a sub-domain or sub-directory is one option you can use to house your site pre-launch. Now let’s look into more detail how you can do that.Here’s a good tutorial for creating a sub-domain and then cloning an existing site to set-up in the staging area. Watch the video here or see the step-by-step tutorial below the video.
How to set-up a sub-domain
- Create a sub-domain by logging in to your host provider’s cPanel and click on “Subdomains” under the Domains section.
- On the next screen, enter the name you would like to use for your sub-domain. Next, select your domain name from the drop down.Common sub-domain names are “staging” and “dev.” cPanel automatically fills the “Document Root” text box.
- Once done, click the “Create” button and you should see your sub-domain in your domain list.
- Verify that your sub-domain has been created by visiting it on a new tab or browser window. It should display an “Index of/” page since you haven’t set-up a site yet.
- Next, create a separate and dedicated FTP account for your staging area to prevent changes from being uploaded accidentally to your live website. In cPanel go to the “Files” section and click the “FTP accounts” option.
- Fill out the text boxes and click the “Create FTP Account” button.
How to set-up a sub-directory
- From your cPanel, go to File Manager under the Files section.
- Open up your home directory
- From your file manager, click on new folder and enter the name of your sub-folder. Again, you can use common names such as “staging” or “dev” or select anything you’d like.
Copying a live website and setting it up in the staging area
After setting up your sub-domain and sub-directory, the next step is to create a copy of the live website to move to the staging area. If you’ll be copying a site with a CMS, you’ll need to copy both the file and the database. If you’re not sure how to do that, there are plugins you can use so you don’t have to understand the technical side of site transfers. We’ll get to those next. If you are a bit more technical or would like to learn how to set-up the database, here’s what you’ll do.
- Log into phpMyAdmin via cPanel and select your live website’s current database on the left hand side.
- Once you have selected your database, click the “Operations” tab in the menu bar and look for the “Copy Database To” box.
- Enter the name of your staging database and tick the “Structure and data,” “CREATE DATABASE before copying,” and “Add AUTO_INCREMENT value” boxes.
- Click the “Go” button and wait for your database to be copied to your staging area. Note that larger databases will take longer to copy.
- After it has been copied, select your database from the left sidebar and phpMyAdmin will open your newly copied database.
- Click the SQL tab and replace all references to the live website to ensure that all databases will work smoothly in the staging area. To do this enter the following code into the text area and replace ORIGINAL_URL with your your original site URL, NEW_URL with the new site’s URL (staging area) and WP if you use a table prefix other than the WP default.

7. Click “Go” and confirmation message will appear once this is complete.
8. 8. Download a fresh copy of WordPress or your website platform of choice, but don’t install it yet.9. Go to the File Manager in your cPanel and right click on the following directories, select copy, enter the staging URL and copy the files:/wp-content/uploads/wp-content/themes/wp-content/plugins10. Access the staging site via the sub-domain or sub-directory you created. You will need to allow WordPress to create a wp-config.php file if one does not exist or you will need to edit the file with the new staging website’s database information. Connect WordPress and your entire database. A prompt for log in will appear and enter the same admin credentials from your live website. And you’re done. Any changes you make in your staging area will no longer affect your live website.11. You can now log-in to the staging area using the same log-in details as the live site. Any changes you make from this point forward will only reflect on the staging site and not on the live site.
Staging plugins and how to use themIf you’re a WordPress user, there are some plugins you can use to create a staging area. The advantage of using a plugin is that you can work with the familiarity of the WordPress interface and don’t need all the technical skills you would otherwise need to do it manually. The plugins usually handle all of the copying of important files and databases, however, going the plugin route also has its downsides.Using plugins is often a multi-step process, which is more involved than the one-click install process many hosting providers are known for. With some plugins you will even need some technical knowledge and skills to successfully set up a staging environment. With that being said, let’s look at a few options for staging plugins you can use to create a copy of a live WordPress powered site.WP Staging
WP Staging is probably the easiest to use staging plugin and the best thing about WP Staging is that it mimics the one-click process of separate staging platforms. All you need to do is install and activate the plug-in, then go to Plugins > Staging to get started. From there you can follow these steps:
- Click the “Create New Staging Site” button.
- Enter a name for your staging site and the plugin will automatically create a subdirectory for your live website.
- Click the “Start Cloning” button, and that’s it. Wait for the process to complete and you can log in to your staging site with the same admin username and password.
The WP Staging plugin is indeed fast like those 1-click staging installs, plus there are no configurations you are required to do. One downside of the plugin versus using a host with a staging environment, is that it can’t automatically transfer the changes to your live website. You have to do it manually. It will provide you with a testing ground where you can edit and experiment with your themes, plugins, code, etc.All-in-One WP MigrationAll-in-One WP Migration is an extremely popular plug-in for users who want to migrate their WordPress website to another host or domain, or to export an exact copy of their website’s content, files and databases, which is the most important task you need to do when creating a staging environment. The plugin is simple to set up and is easy to use. Once you have installed it you can follow these steps to create your staging area:
- From your dashboard, go to “All-in-One WP Migration > Export.”
- You can copy all your files as is or you can use the “Find and Replace” function to change or exclude any files such as the spam comments, URLs, pages and even your post drafts.
- Save the export file and when that is done, head on over to your staging site’s WordPress admin page.
- Install the plug-in again on your staging site and go to “All-in-One WP Migration > Import”
- Drag-and-drop the export file in to the area and wait for the upload to complete.
- Once completed you have to log-in using the admin credentials from your live website.
- Update all permalinks and click the “Save” button twice.
This plugin is a lot like setting up a staging area manually. Its main advantage is that you can choose and replace any existing elements on your live website that you do not want to be copied to your staging area. The downside to this method is that it does take a lot of time as you have to set up a separate WordPress website and install the plugin again, however, it is a great option if you want to be more hands on when migrating your files.DuplicatorIf you want a transfer process and a staging site that is completely configurable then the Duplicator may just be the plugin you are looking for. One great thing about the Duplicator plugin is that you do not need to set up a separate WordPress site. However, using this plugin does require some technical knowledge and skills, so this may not be the best option for complete beginners. Here are the steps you need to follow to use Duplicator and create your staging area:
- Click the “Duplicator” menu from your WordPress dashboard and go to the “Packages” screen.
- Click the “Create New” button.
- A system scan will start and it will show the details of your existing live website; Click the “Build” button.
- Once the “build” has completed, you have the option to download the installer and archives files; download both files.
- Go to your web host via FTP and upload the files to an empty directory. You can also copy the files to a folder under your web root if you prefer to work locally.
- Open a new tab or a new web browser and enter the URL for the install file.
- Enter any configuration detail you want to add on your staging site such as connection settings.
- Click the “Run Deployment” button and follow the instructions on updating your databases
- Once completed, test your staging website if it’s working.
Hosting companies who provide staging environmentsIf you’re looking for an easier way to get this staging area set-up so it’s easy to use, selecting a hosting company that provides a 1-click staging environment install, may be the best way to go. Now if you’re a complete beginner or you do not want to spend too much time setting up a staging area manually, there are several hosting companies who can do the job for you. Below areGet Fly Wheel (my top recommendation for web design entrepreneurs)Get Fly Wheel is a popular hosting solutions provider for WordPress users and the offer one-click staging environments. They make developing a site easy to do with their demo sites, staging sites, billing transfers and project collaboration tools. The interface was designed to be very easy to use so you’ll have no trouble navigating around your account and the available tools. Get Fly Wheel also allows you to reset your staging area and then it pulls over a fresh copy of your live website. This is a very handy tool if you want to discard your changes and start over quickly. The platform also allows you to move staging changes to your live site with just a click of a button which is an enormous time saver.some options you may want to consider and next we’ll look at the steps for setting up a staging site using each of these hosts.WP EngineWP Engine is a hosting provider that specifically manages websites that were created using the WordPress platform. WP Engine is a good provider especially for beginner or website owners who do not have technical web design skills. They manage all of the web hosting needs, including setting up a staging environment, security, speed and more. Some of the great things about WP Engine are the user-friendly interface, the fast service, and the additional tools that make it easy to manage your staging area. It’s also SEO-ready for those who are concerned with optimization and conversions.SiteGroundJust one of the things to love about SiteGround is its staging functionality that comes with it’s GoGeek plan. You can create an affordable staging area with just one click and they transfer all of your data quickly and free if you already have an existing account with them. SiteGround also supports other content management systems, so if you’re not using the WordPress platform and you need a hosting provider to create a staging website, then SiteGround may be a good option to consider.WP StageCoachIf you want a staging environment provider that is separate from your hosting company, then you can use WP StageCoach. The interface and features are quite good like the one-click staging copy, password-protect on your staging site, and FTP access. They have their own server so you do not need to set-up separate hosting for your staging site and they also allow you to choose particular changes you want to import and upload on your live site.Now that you’ve seen some of your hosting options, select the one that you believe works best for you. Next we’ll look at how to set-up the staging environment with each of these hosts.How to use the Get Fly Wheel Staging AreaIt’s time to take a look at how to set-up a staging area on FlyWheel. This hosting platform was created for designers and developers so it has a variety of features that will make your life a whole lot easier. Here’s how to set-up the staging area:
- Log in to your account and click the “Advanced” tab.
- Turn on the “Enable Staging” button.
- A pop-up will appear and confirm if you indeed want to enable staging; tick the “Yes” box and click the green “Enable Staging” button.
- You will be redirected to your account’s dashboard and you should now see the “Staging” tab beside the “Billing” tab. You now have set up your staging site.
Managing your staging site
- Go to your account’s dashboard and select the “Staging” tab.
- The “Staging” tab contains your staging site’s details and protocols such as the following:Staging domain – which is the temporary URL you can use to view your staging site.Password – where you can check and edit your staging site’s log in credentials. Take note that your staging site is automatically password-protected by Get Fly Wheel.Options section – which contains the flush cache, WP_DEBUG, and reset staging buttons.“Move staging changes to live site” button3. To view your staging site’s files and databases, you can also go to the “Staging” tab look for the listed database table prefix.
Moving your staging copy to your live site
- Go to your dashboard’s “Staging” tab and click the “Move staging changes to live site” button.
- A pop-up message will appear asking for your configurations and confirming the task.
- Tick the “Copy staging database to production” check box. Take note that this will completely overwrite your live site’s database with your staging database. Make sure you have tested all changes and that they are working before you do this.
- Tick the “Yes, I am sure I want to move staging changes to my live site” check box and click the green “Move changes to live site” button at the bottom of the pop-up window.5. There is also a “Backup the current site before moving changes” check box. You can tick this if you want the platform to generate a backup of your current live website before publishing any changes.
How to use the WP Engine Staging EnvironmentCreating and setting up a staging site with WP Engine can be done in just a few steps. Let’s take a look:
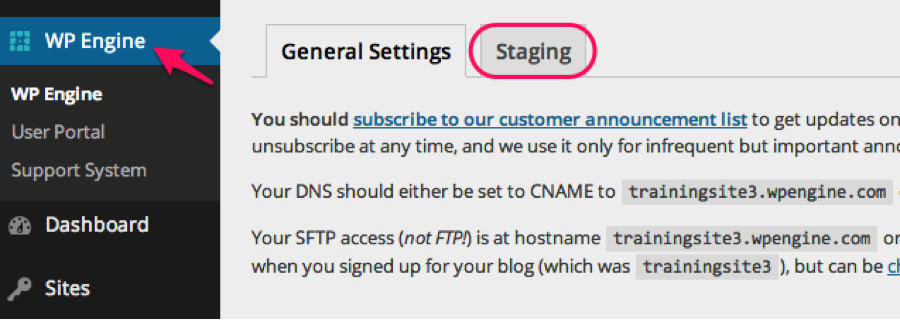
- From your WordPress dashboard, click on the WP Engine menu.
- Go to the “Staging” tab and click the “Copy site from LIVE to STAGING” button.
3. A green pop-up box will appear, showing the progress of the task. Note larger sites will take longer to copy.
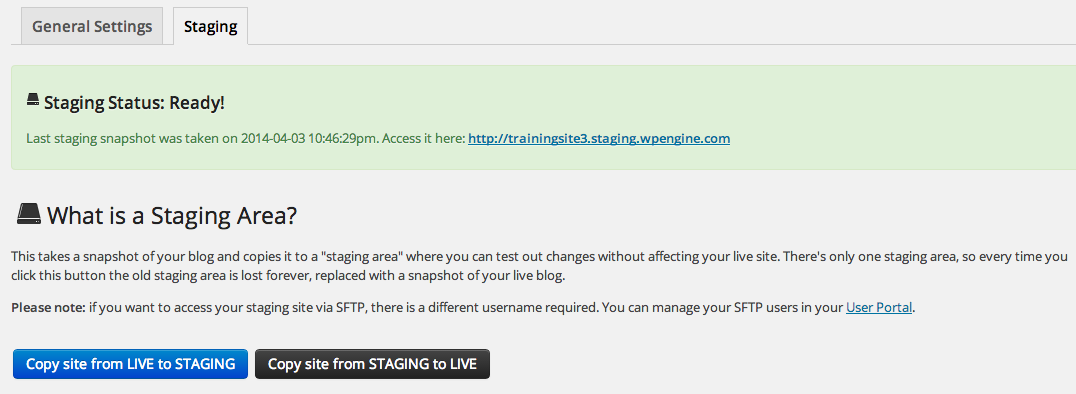
4. Once the staging site has been created, you will be given a link where you can access it.
5. If there is already an existing staging area for your live website, WP Engine will overwrite it.6. The staging area can be accessed through the live site and other users who have access to the live website will also have access to the staging environment.Accessing the staging environment’s database and files1. For the database, go to the User Portal and click “PHPMyAdmin.”2. Select the database labeled as “username_[installname].” This is your staging area’s database. For example, if you named your staging area’s database as “stagingdatabase, it will be labeled as “username_stagingdatabase.”3. For the files, access them via SFTP. The process for accessing your staging files is the same from your live website. The difference is that you will use the log in credentials from the User Portal.Copying the staging site to the live site1. Log in to your live website’s WordPress Dashboard.2. Go to the WP Engine menu on the left side bar and select the “Staging” tab.3. Click the black button that is labeled as “Copy site from STAGING to LIVE.”4. A prompt with a dropdown menu will appear. You can choose to copy all, none, or specific database tables from your staging area to your live website. Select the option you want to be implemented on your live website.How to use the SiteGround Staging EnvironmentTo use the SiteGround staging environment, you’ll need to have a GoGeek plan. Here are the steps to set-up your staging site with SiteGround:1. Access the SiteGround Staging Tool, locate which website on the list you want to work on and click the “Create Staging Copy” button beside it.
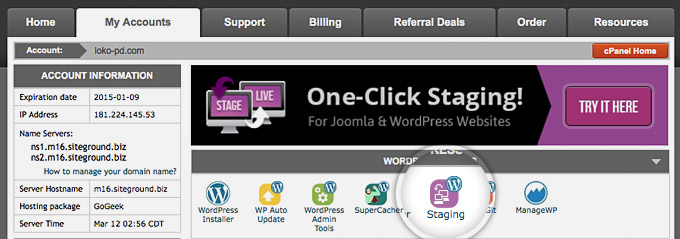
2. A pop-up will appear that will ask you to choose which files you want to copy and discard from your staging environment.3. Another prompt will appear, asking you this time if you want to password-protect your staging environment or not. It is recommended to always password protect your staging environments.4. Click the “Continue” button and you’re done!Managing staging environment using SiteGround1. Once you’ve copied your live website, go back to the SiteGround Staging Tool.2. Look again at the list of websites, and your chosen live website should now have a “Manage Staging Copies” button beside the “Create Staging Copy” button.

3. Click the “Manage Staging Copies” button and you will be redirected to the staging management page.The staging management page contains the following actions and options:
- Push to Live – option to replace your live website with your staging copy and publish all the changes you have made.
- Destroy Copy – button you will click if you want to erase or “destroy” your staging site
- Replicate – option to clone the current staging area so you can revert back to it if you make a mistake with your edits or changes.
- Password Protection – this button gives you the option to password-protect your staging environment if you have not done so during creation.
- Admin Panel
- Create Git Repo – option if you want to create a Git repository of your staging area.
Copying the staging site to the live site
- Go to the staging management page and click the “Push to Live” button.

2. A pop-up will appear and will ask you to choose between two options: Easy Push or Advanced Push
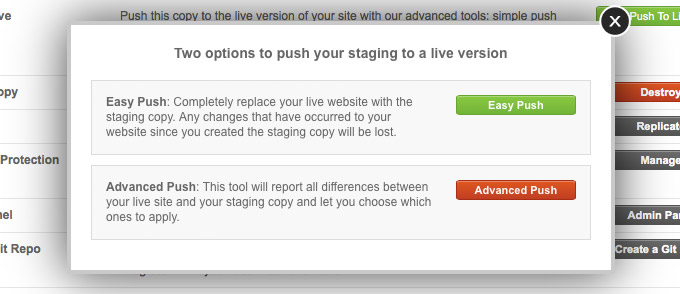
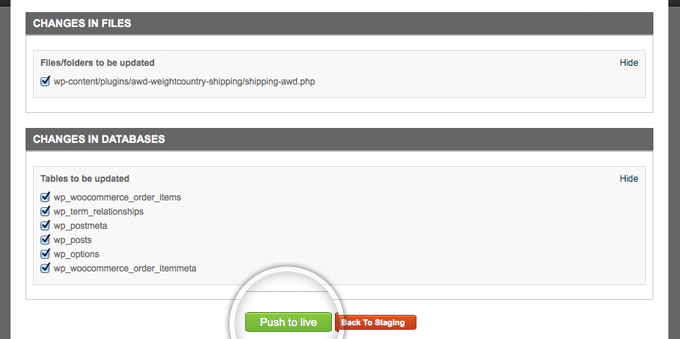
3. The Easy Push option fully replaces your live website with your staging copy and that includes all files and databases. The Advanced Push option allows you to choose which files, tables and databases from your staging you want to publish on your live website.4. Click the green “Push to Live” button and your changes will be transferred to your live website.
Using WP Stage Coach
Here’s how you can set-up a staging area using WP Stage Coach.1. Sign up for a WP Stage Coach account. Once you completed your purchase, download the plugin from the link that will be provided to you or you can download it from your “Account” page.2. Go to your WordPress Dashboard and go to Plugins > Add New and install and activate the plugin.3. Go back to your WordPress Dashboard and select the WP Stage Coach menu.4. Enter the username you used to sign up for a WP Stage Coach account and enter the corresponding license key.Creating a staging area with WP Stage Coach1. Go to your WordPress Dashboard and select the WP Stage Coach menu.2. Customize your staging site URL.3. Tick the “Disable caching plugins on staging site” box to make sure your staging site and its plugins will work properly.4. Check the “Password protect the staging site” box.5. Click the “Ride the Stagecoach!” button. The plugin will start creating your staging site and it will display updates and messages regarding your progress.6. Lastly, you will be provided with a URL where you can access your staging site.Managing your staging site and importing changes1. Go the URL provided to you by the plug-in and enter your log in credentials. The log in credentials from your live website will be the same credentials you will use on your staging site.2. To import your changes to your live site, go to the WordPress Dashboard and click the WP Stage Coach menu.3. Select the “Import Changes” sub-menu. The plugin will take a few moments to review all the changes you’ve done on your staging site.4. You can choose to do a one-click import, which will import all changes you’ve made and overwrite all data on your live website. You can also choose an advanced import where you can choose specific files, databases and elements you want imported. The plugin also gives you the option to import changes manually.5. After you’ve made your configurations, click the “Import” button.Your Next StepsA staging area gives you the convenience of testing out any changes you want to make on your live website in a separate and independent environment that will not affect the current status of your live website. Your live website keeps on running and no functionalities are disabled and most importantly, you will not risk affecting the flow of the business, conversions or sales.As you can see, there are many ways you can create a staging area. Don’t be concerned with choosing the “right” option. Select what you feel you can do based on your experience and then get it set-up so you can begin taking advantage of the benefits of having a staging site.
